FlowLayout – a Spark Custom Layout Example
I’ve been working on the Flex SDK team for more than a year now, primarily playing with the Spark layouts. One of the new Spark features is the “assignable layouts”. The stock layouts have been separated into their own classes and the containers can be assigned different layouts at run-time. This modularization allows anyone to create their own cool custom layouts and use them with any of the Spark containers.
I want to show how easy it is to create a custom Spark layout. I’ve chosen a flow layout example where all the elements are arranged horizontally, wrapping to the next row when the width limit of the container is reached. For simplicity I’m going to assume that all elements are of equal height.
Update: Check out part 2 of the article here.
Step 1 – Simple List Application with a Stock TileLayout
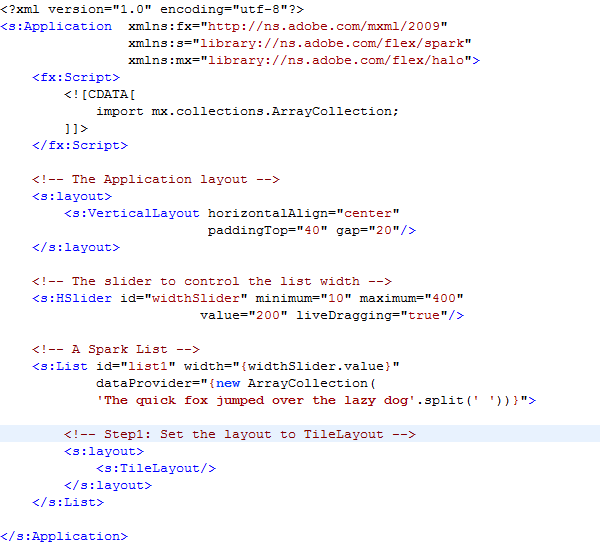
For starter, let’s get a simple application going with a Spark List with a few items. I’m going to add a slider that controls the width of the List. By default the List’s layout is the VerticalLayout, but I’m going to switch it to the stock TileLayout just to contrast it with the FlowLayout that I’m going to put together further below.
And the source code:

FlowTest.mxml
Step 2 – A Custom Layout Skeleton Class
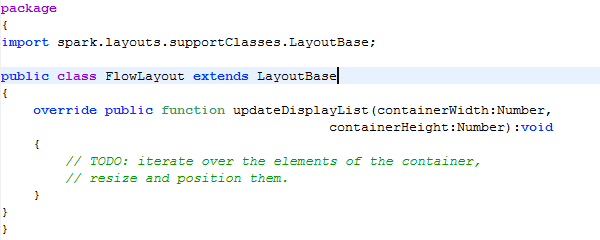
Next step is creating the skeleton for the custom layout. I’ll create a new AS class FlowLayout.as, and since it is a custom layout, it must subclass LayoutBase. The LayoutBase provides a lot of default functionality, but the most important methods I need to override are updateDisplayList() and measure().
- updateDisplayList() is called by the container to size and arrange the container’s elements.
- measure() is called to calculate the default size of the container based on the container’s elements. I’m not going to override measure(), as the List skin already has default size.

FlowLayout.as
Step 3 – Make Sure It Does Something
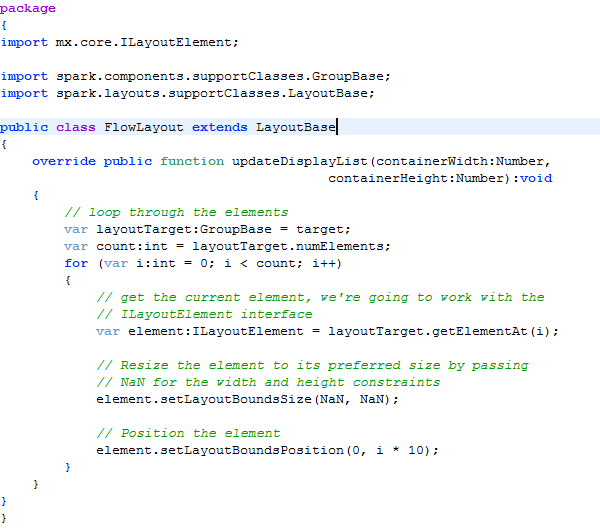
Now I’m going to iterate through all of the container’s elements. I’ll access the container through the layout’s “target” property, which is of type GroupBase. To work with the elements I’ll be using the ILayoutElement interface, specifically the following APIs:
- setLayoutBoundsSize(width, height) – where I can also pass in NaN leaving the element to size itself to its preferred size.
- getLayoutBoundsWidth(), getLayoutBoundsHeight() – to get the current bounds of the element.
- setLayoutBoundsPosition(x, y) – to position the element. Coordinates are relative to the container’s origin.
Before delving into too much coding, let’s just size every element to it’s preferred size, stagger them vertically by 10 pixels each and setup the List to use the the new FlowLayout.
And the source code:

FlowLayout.as

The update to the flowText.mxml
Final Step – Finish the FlowLayout
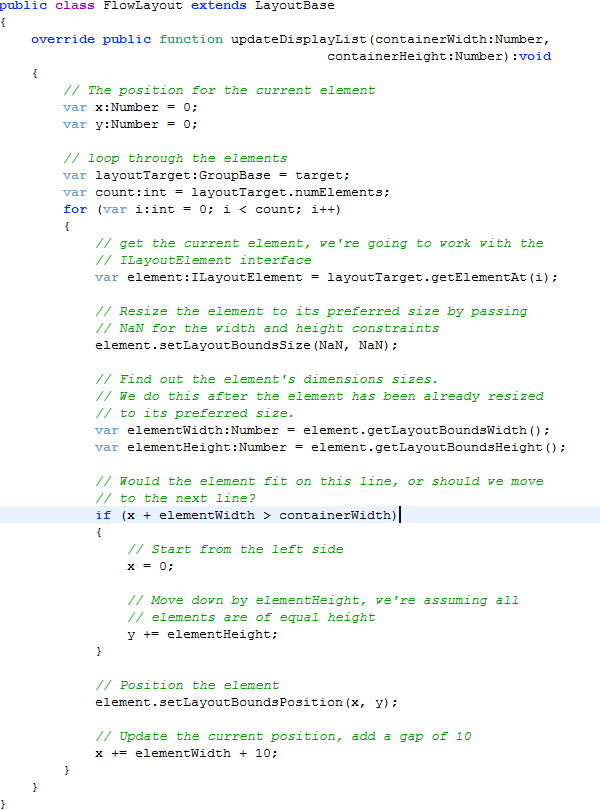
And now let’s finish the FlowLayout – I want to arrange elements left to right, space them by 10 pixels, and move the elements down when there’s not enough space to fit in the containerWidth. With a couple of lines I get the final result:
And the final code looks like this:

Final source code of the FlowLayout.as
Hope you enjoyed it!
Download the source files here.

In the finished example at the top of the screen, the list got a scroll bar when the items didn’t fit entirely in the box. The example at the bottom does not. How do you force the scrollbar to appear when needed?
Hey Rob, good point! In general, to get scrolling, you need scroll bars that are bound to the horizontalScrollPosition and verticalScrollPosition layout properties. You’d also need to configure the scroll bars’ scrolling range. Specifically in Flex4 we made that easy, as we implemented most of the functionality in the Scroller. The Scroller automatically shows/hides the scroll bars and binds them to the scroll position of the layout. Also, the List skin already has a Scroller by default!
The only thing that is missing from the FlowLayout code is calculating the actual scrolling range. In the layout you need to calculate the size of the content area (usually maximum x/y of the) and set it on the layoutTarget through the setContentSize() method.
So adding the following code as the very last line (after the loop) in the FlowLayout.updateDisplayList() should do the trick:
layoutTarget.setContentSize(x, y + elementHeight);
-Evtim
I would be interested in how to do “grouping” using the new layout.
Cheers
Gareth.
Hi Gareth,
what do you mean by “grouping”, can you give me a specific example?
-Evtim
So…the layouts have css properties, right? So you could set FlowLayout css properties for things like horizontalGap to replay elementWidth+10, right?
Just curious.
Hey John,
Generally our Flex4 layouts have properties and don’t use css styles. If you take a look at the FlowTest.mxml the Application’s VerticalLayout has its paddingTop, gap and horizontalAlign properties explicitly specified, these are not css styles, but properties on the VerticalLayout class itself. For a custom layout you can also follow this pattern, or if you really want styles, you could do that as well, but you’ll need to do more work to make sure the layout is part of the style chain and you detect when a style changes. One reason for our choice to do properties for layout configs was that it was obvious which are the supported properties for a particular layout and also this way it was more extensible – we didn’t have to pre-define a set of layout-related styles.
-Evtim
HI Evtim,
Glad to see you started a blog.
I’ve just watched the flashcamp presentation Ely gave where he used a demo of a 3d wheel layout you did. lovely.
any chance of making the source for that available? Would love to have a look through it.
feel feel to drop me an email, would love a chance to talk.
kindest regads
glenn
tinylion
Thanks Glenn,
Yup, I wrote that one as a proof-of-concept that our APIs are suitable for 3D layouts. I’ve actually checked it in our flex4test project and therefore you can get the source from here
http://opensource.adobe.com/svn/opensource/flex/sdk/trunk/development/eclipse/flex/flex4test/src/layouts/WheelLayout.as(of course it’s outside of the SDK, so it’s not supported ;)) I’m thinking about having a separate post for 3D layouts, but probably after I cover some more of the 2D layout basics.Edit: because of a recent rename, the location to the source has changed to this link http://opensource.adobe.com/svn/opensource/flex/sdk/trunk/development/eclipse/flex/sparkTest/src/testWheel.mxml
Hi Evtim,
Thanks for the example. Gumbo is very cool
HI Evtim,
thanks for that. Funny thing is, i’ve been using nightly builds of the sdk every day since u first put it all online., yet i’ve never looked into the test code, maybe i should spen a few minutes having a liitle digg around in there. 🙂 never know what interesting things i may find.
cheers for the heads up.
great work by the way. been using sdk4 since early early alphs, and love it. its a real step forward in my opinion. great stuff
all the best and thanks again
glenn
tinylion development uk
@Evtim
Ok, that works. Thanks for the explanation.
Thanks for the posts, very enlightening. Any chance you can post the source for the 3d layout soon ?
Sure thing! The source is available online and I just published a quick post for the location and a small mashup showcase here http://evtimmy.com/2009/06/wheellayout-source-and-quick-mashup/.
Thanks for posting the well example. I notice that both in the wheel and the flowlayout (swf at the end), key board navigation does not seem to work while for the flowlayout at the top of the page, key board navigation (selection) does work.
What would we need to do to enable keyboard nav/selection?
Hi superabe, that’s a good observation!
The example where the keyboard works uses the stock Spark TileLayout. For all other examples, I’m using custom layouts for which I didn’t implemented keyboard navigation. To make keyboard navigation work, you need a container that supports it (List supports navigation) as well as a layout that supports it. In a custom layout to get navigation working, you’d need to override the
LayoutBasegetNavigationDestinationIndex()method (in the Flex 4 beta, it’s name is different –getDestinationIndex()). Basically the container calls the layout’s method passing current index and a keycode. The layout calculates which item the list needs to navigate to. For example in a TileLayout pressing the “left” will return the index of the element on the same row, but one column to the left. You can take a look at how this function is implemented for TileLayout for example. The latest post-beta version can be found here http://opensource.adobe.com/svn/opensource/flex/sdk/trunk/frameworks/projects/spark/src/spark/layouts/TileLayout.as. Let me know if you need more info.Thanks for the tip. I was able to extend the HorizontalLayout class to get the layout I want while leveraging the existing keyboard navigation
Hi Evtim. I’m hoping you can help me. I want to create a ‘PagedList’ component that will automatically create pages of its data based on the visual implementation of the data. Do I need to control this within a custom Layout or is this not part of the scope of a ‘paging’ mechanism. I don’t feel that paging really counts as layout. I’m wondering how to approach this. Do you have any thoughts?
Hi Lee,
I actually haven’t played with data paging. Totally off the top of my head, I’d imagine that you’d need to subclass DataGroup. There you can override the method
getVirtualElementAt(index:int):IVisualElement. This method is called by the layouts to get the item renderer for the item with the specified index. In your case, if this element is not yet paged in, you can probably return an instance of a special item renderer that will be your placeholder for the not yet loaded item. Probably on updateComplete() for your component you can send a page in request and update your data.
If that works, you could use your subclass, say PagedDataGroup, as a skin part in a skin for your component, probably even for a custom skin for the Spark List. These changes may also require some modifications in the DataGroup itself, but I don’t know at this time as I haven’t explored it.
I’d also like to refer you to the Adobe open source forums, the ones for the Flex 4 beta here http://forums.adobe.com/community/labs/gumbo/ or some more general ones here http://opensource.adobe.com/wiki/display/site/Forums.
-Evtim
Hi Evtim,
I’m working on an app that has to be able to switch between western and RTL (Arabic) language/layout during runtime.
It’s a classical business app with bunch of tables, text fields, buttons scattered all around the screen and when turning to Arabic entire UI has to mirror.
I’m doing a research on the best way to accomplish this functionality and I’d deeply appreciate if you have any tips about the path to walk regarding layout engine.
Cheers,
Tomislav
Hi Tomislav,
Some form of RTL has been on our list, though I don’t know when we’ll be able to get to it. Some examples I’ve seen doing this use negative scaling and x offset on the components to flip them. You’d have to be careful which components are flipped and which are not as you walk down the display tree. Also you can probably use the “offsets” property to modify the post-layout transform. Also, you can take a look at the Flex 4 beta forums here for more insights on the topic http://forums.adobe.com/community/labs/gumbo/
-Evtim
Hi,
thanks for tips. I did a simplest possible solution by extending BasicLayout and my updateDisplayList() looks like this:
super.updateDisplayList(width, height);
//read direction from CSS
if (target.getStyle("direction") == 'rtl') {
for (var i:int = 0; i < target.numElements; i++) {
var x:Number;
var y:Number;
var element:ILayoutElement = target.getElementAt(i);
x = width - element.getLayoutBoundsWidth() - element.getLayoutBoundsX();
y = element.getLayoutBoundsY();
element.setLayoutBoundsPosition(x, y);
}
It works well except that sometimes I get items that are not affected by mirroring after changing layout preferences during runtime…
Five blls
Very useful, bookmarked
Regards – many thanks for this
i want to create application in flex (mxml)i want to design like,when i click on button the left box should be shifted in left please help me
Hi Anil,
I think that you probably just need to use a BasicLayout container and add a click event that will change the left constraint (or x coordinate) on your box.
Take a look through the Flex SDK documentation, and additionally you can search the forums here .
You’ll notice that if you make the width really small (or the elements really big) the first item is bumped down one row. So I found myself writing:
if (i>0) { y += elementHeight; }
to never move the first element down.
Hey Justin, you’re right. I have it fixed at my part 2 of the FlowLayout here http://evtimmy.com/2009/06/flowlayout-part-2-gap-verticalalign-and-scrolling/
hi,
I am new For this flex please help me in this type of application Product that i can start from the begining.
Thanks and Regards,
Bridge Logic System Sofwtare Pvt Ltd.
9971466260
http://www.bridgelogicsystem.com/
@Evtim
Hey – quick question – I’m having some trouble with a Flex 4 layout that I want to be liquid, 100% width AND height. Trouble is, I’m having a hard time getting my containers to clip properly when I resize the browser window, while the outermost container resizes correctly, the inner ones (where I have a scroller attached) seem to ignore the resizing and don’t clip properly.
Has anyone dealt with this issue and have a solution? Of course I could just do a fixed height, but that wouldn’t be ideal.
Hi Matthew,
I’d have to see an example of your container arrangement to be able to tell if there’s something wrong or perhaps we have a bug in the SDK 😉
Some issues that we see more often than others:
– make sure to set the 100% on the Scroller itself, and not on the container inside the Scroller.
– make sure that the container doesn’t have some explicit or measured minimum size that will prevent it to shrink below that point. Easiest way is to explicitly set some minWidth=”0″, minHeight=”0″
how to add effects on invoking setLayoutBoundsSize() and setLayoutBoundsPosition()?
Hi,
When i create your example i keep on running into the problem that the “layoutTarget.getElementAt(i);” returns null.
Do you have any idea’s on what i’m doing wrong?
@Arjen
Figured it out myself, since is was using a itemrenderer i needed to use “getVirtualElementAt”
I just read a few other posts on here. Glad I checked it out again. Nice work
Hi actually I am developing an Flex album. I am using List to display thumbnail images. I have applied tile Layout. But the thing is I need to specify padding top and bottom. How can i implement custom extended Tile Layout with this feature. Can you give me some tips
What about scroll bars and custom layouts? How difficult are they? Specifically: http://forums.adobe.com/thread/765682?tstart=0
Hi Evtim, I need the flow layout to fill 100% of each row width, possibly enlarging the items that it contains.
Example: suppose the first row contains 3 items of width 100, 200 and 300 (total = 600) and the layout width is 800, then resize the items to 133, 267 and 400, so that the total is now 800.
Same for the other rows.
Is that possible?
@Maurice
Yeah, resizing the items to fill in the total width of the row should be possible, you’d need to touch the logic in updateDisplayList() – you already know the total width, then calculate the percentage of each element based on element’s preferredWidth() / sum (all element’s preferred widths) and apply that percentage to the “width” that gets passed in the updateDisplayList() method.
Hi Evtim, I am trying to create a org chart using flex 4 layouts. I basically want to write 1 rectangle at level 0, 2 rectangles at level 1 and 4 rectangles at level 2 and connect them with lines. I want to call the layout twice, once to draw the rectangles and once to draw the lines. How do you know what the x and y coordinates are for components after drawn using the layout.
Actually you have wrong height measurement. You should override and write something sensible to measure(). Check this out http://saprahan.blogspot.com/2012/03/adobe-flex-flow-tabs-layout.html
absolutely genius!
Hi there,I read your blogs named “Easy Flex » FlowLayout – a Spark Custom Layout Example” on a regular basis.Your story-telling style is awesome, keep up the good work! And you can look our website about proxy free list.
I must say you have hi quality content here. Your posts should go
viral. You need initial boost only. How to get
massive traffic? Search for; Murgrabia’s tools go
viral
Everything is very open with a very clear explanation of the issues.
It was really informative. Your site is useful. Many thanks for sharing!